
Quesada Pasiega
Traditional Recipe to cook Quesada Pasiega
CANTABRIA
12/12/20253 min read

The Essentials: Ingredients List (For a 24cm Round Cake)
Recipe Summary
Prep Time 20 minutes
Cook Time 45-55 minutes
Chill Time 2 hours (Recommended)
Servings 8-10 people (Round Cake)
Origin Valles Pasiegos, Cantabria, Spain
Cuisine Spanish / Cantabrian Traditional Dessert
The Dairy Base (Crucial):
750 g (3 cups) Fresh, soft white cheese, curd, or ricotta (Queso Fresco or Requesón). (Crucial: It must be high-moisture and unsalted).
100 g (approx. 7 tbsp) Unsalted Butter, melted.
The Dry and Sweet:
200 g (1 cup) Granulated Sugar.
100 g (3/4 cup) All-Purpose Flour.
The Aromatics:
1 Large Lemon, zested (use only the bright yellow part).
1 tsp Ground Cinnamon.
The Binder:
3 Large Eggs.
For the Pan:
A touch of butter and flour for greasing.
Rustic Sweetness: Mastering the Authentic Quesada Pasiega from Cantabria
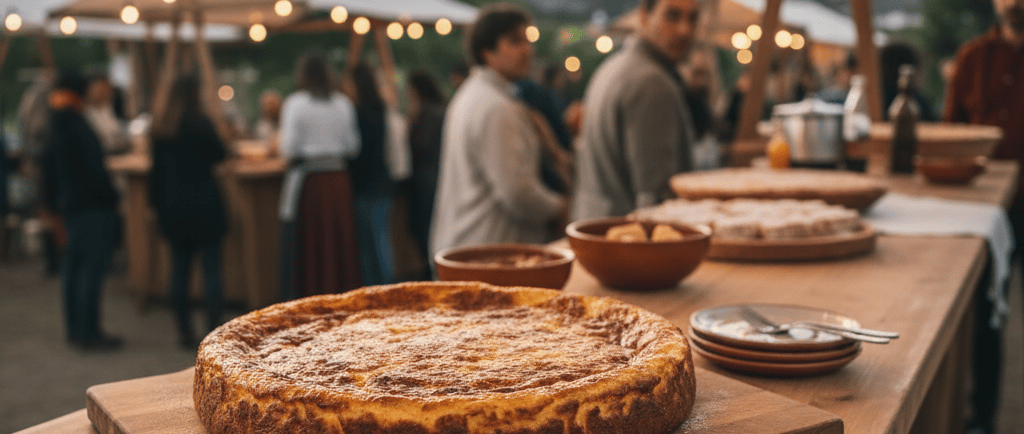
The Quesada Pasiega is Cantabria's most cherished dessert, a dense, creamy, and fragrant cake that captures the pure essence of the region's dairy heritage. Hailing from the picturesque Valles Pasiegos (Pasiegos Valleys) in the interior of Cantabria, this is not a modern cheesecake but a traditional baked curd dessert, boasting a unique texture that is firm yet moist, and intensely flavored with lemon and cinnamon.
The Dairy Legacy of the Pasiegos Valleys
The Valles Pasiegos region, known for its lush green pastures and high-quality livestock, has historically been centered on dairy production. The Quesada was born out of the necessity and abundance of fresh, soft curd (cuajada or requesón), a staple product made daily from the milk of the local cows.
The Traditional Secret
The key to an authentic Quesada Pasiega is not cream cheese, but the fresh, soft cheese or curd (queso fresco de Burgos or requesón). The quality of the milk is non-negotiable. The recipe's brilliance lies in its simplicity: a soft curd base, sweetened with sugar, scented with lemon zest and cinnamon, and bound with eggs and a touch of flour. It is traditionally baked in an earthenware dish (cazuela) and served warm or at room temperature. This dessert is a simple celebration of the land and the pristine quality of Cantabrian dairy.
Process
Step-by-Step Mastery: Achieving the Perfect Texture
Phase 2: Building the Batter
Incorporating Aromatics: Add the granulated sugar, lemon zest, and ground cinnamon to the mashed cheese. Mix thoroughly until the sugar is fully incorporated.
The Eggs: Lightly beat the three eggs in a separate bowl. Add them to the cheese mixture and whisk until everything is smoothly combined.
The Fat: Pour in the melted butter and mix well. The Cantabrian tradition uses plenty of good butter, which adds moisture and richness.
The Flour: Sift the all-purpose flour directly over the batter. Gently fold the flour into the mixture using a spatula or wooden spoon.
Crucial: Mix until just combined. Overmixing the flour will develop gluten and result in a chewy, tough texture, which is the opposite of the desired soft, delicate quesada.
Preheat and Prepare: Preheat your oven to 180°C (350°F). Grease and flour a 24cm round cake pan or an equivalent size earthenware dish (cazuela).
The Bake: Pour the liquid batter into the prepared pan.
The Cook: Bake for 45 to 55 minutes. The quesada is ready when the edges are golden brown and set, but the center still has a slight wobble to it. The top will also develop a signature deep, caramelized crust.
Cooling: Remove the quesada from the oven. Let it cool completely in the pan on a wire rack. Anecdote: Traditional quesadas are often baked until they shrink considerably and pull away from the sides, which is perfectly normal for this dense, curded cake.
Phase 3: Baking
Phase 4: Serving
The Rest: The quesada is best served after it has cooled and rested for at least 2 hours. Traditionally, it is often eaten at room temperature.
Presentation: Serve directly from the baking dish or invert it gently onto a serving plate. The texture should be dense, moist, and cut cleanly, bearing the characteristic marks of the baked curd.
Phase 1: Preparation (The Day Before)
Draining the Cheese: If your soft cheese or ricotta is very wet (as requesón often is), place it in a cheesecloth or a fine-mesh sieve and allow it to drain for 1 to 2 hours. The final texture should be moist, but not watery.
Mashing: Place the drained cheese in a large bowl. Using a fork or a wooden spoon, mash the cheese until it is smooth and lump-free.
Expert Tips for a Perfect Finish
The Freshness of Curd: If you cannot find good quality queso fresco or requesón, a decent substitute is well-drained, full-fat ricotta cheese. Avoid using cream cheese (like Philadelphia-style), as it will yield a different texture and flavor profile.
Do Not Overbake: Unlike a custard, which needs to be fully set, the quesada relies on moisture. Baking until the center is just barely set will ensure the characteristic smooth, moist interior texture.
The Cinnamon/Lemon Balance: Use freshly grated lemon zest (avoiding the bitter white pith) and high-quality cinnamon. These two aromatics define the flavor of the quesada and must be prominent but balanced.
Pairing: The perfect accompaniment is a glass of Cantabrian or Basque cider (sidra) or a sweet, fortified wine (vino dulce) to complement the sweet, spiced aroma of the dessert.